Wednesday, December 29, 2010

The Classics: Frutti Di Mare

At least for me this is a classic.  Frutti di Mare is my family's traditional dish for Christmas Eve.  It is essentially fish stew over linguini.  Not complicated to make but time sensitive because it involves a fair amount of shellfish.  You don't want to start this dish too early or cook the seafood a little too long.  There is nothing worse than rubbery little mollusks.  Which means you are starting your cooking right after your guests arrive just to make for the start of a hectic holiday dinner.  The up side?  It is worth it!  Every last bright tomato and seafood bite!

This year I had been wondering about why we Italians have the seafood feast on Christmas Eve.  I never questioned it before because, well, why question a good thing?  The origins come from the Roman Catholic Church where, like on Good Friday (despite this overly optimistic name, it is the day when Jesus was crucified) observant Catholics do not eat meat.  With a little research I found a few possible answers as to why there are seven fishes served for Christmas Eve although none confirmed as true.  The number seven reoccurs in Catholicism.  It took seven days for Mary and Joseph to travel to Bethlehem.  God created the universe in seven days.  The Catholic Church has seven sacraments.  Mortal sins are summarized in the Catholic religion by the following seven: pride, envy, lust, gluttony, greed, sloth and anger. 

Religious or not, if God (or anyone else) says I need to eat seven types of fish on any day of the year I will not argue. Though preparing one meal with seven fishes is not an easy task.  We are usually shy one or two.  This year we were missing one because a family member is allergic to lobster.  Frutti di Mare is a great way to get as many as you can in one pot.  I am going to recommend a recipe from the Epicurious site that I have used two years in a row.


Sunday, December 19, 2010

Details, Mistakes and Good Little Cakes: Butter Rum Cupcakes

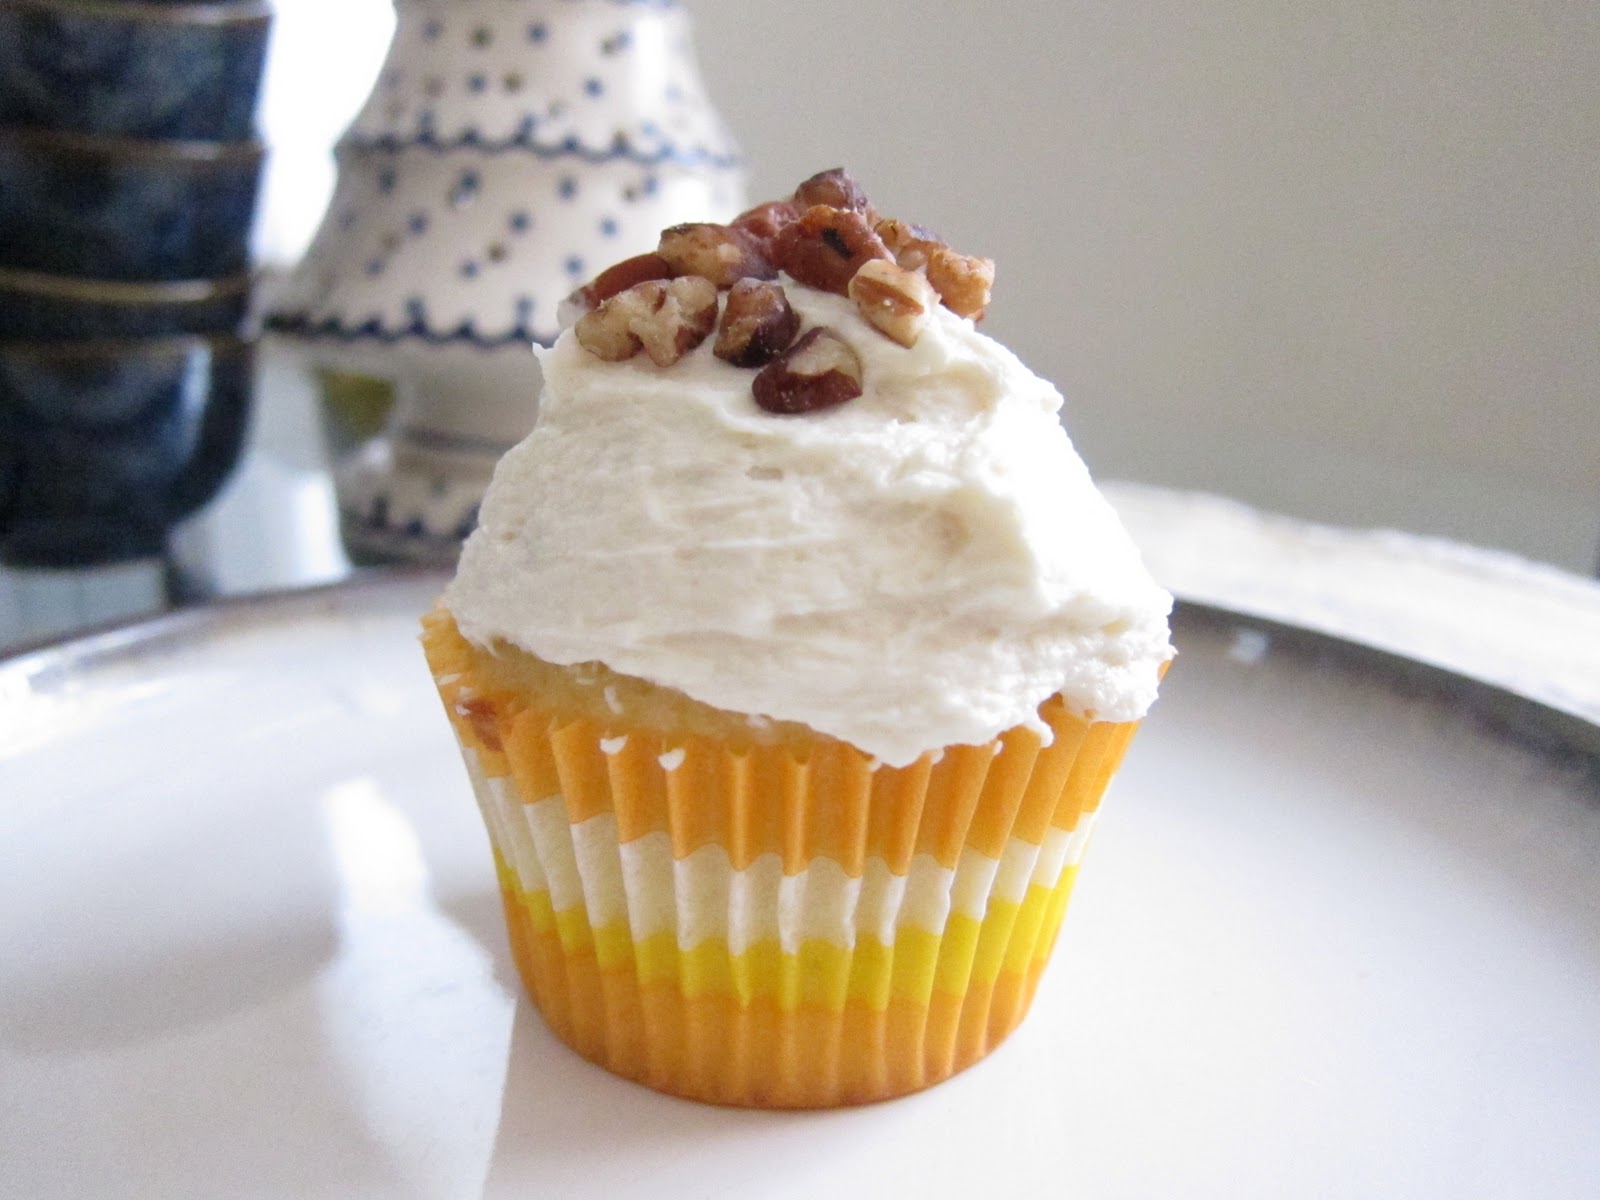
Butter Rum Cupcake topped with Pecans

Life never ceases to remind me of the importance of small details.  I feel as though all of my efforts seem to go to managing and remembering numerous seemingly small facts that make up perfecting a larger picture.  Honestly, this can often overwhelm me. Of course it also makes me better at the things that I do.  I am determined, therefore, to continue onward in my quest for perfection and find new ways to collect techniques and adjust small details in cooking and designing and other aesthetic pursuits.

I feel I have more control over cooking than many other aspects of my life sometimes.  Cooking is never out of control.  There are always things that I can be sure of.  For instance, I know that if I slow cook onions in fat they will melt into a sweet, aromatic translucent deliciousness.  I know if I stir arborio rice for an hour it will release starches and become a creamy, base with pearls of rice to absorb whatever flavor you add to it.  These I have learned over many years of trial and error cooking.  

Baking, on the other hand, is a newer experience for me and one that requires a lot of exacting details.  Let's face it, there is no turning back once you have forgotten the baking powder.  However, most of the time forgetting an ingredient while cooking is not cause for ruins.  There is something to be said for the ability to improvise and learn from the step you have forgotten.  So goes the adventure of my Butter Rum Cupcakes.

Nick and I were visiting our friend, Janice, in Beacon for her birthday.  She was throwing her own birthday dinner and the least I could do was bring the birthday dessert.  I am not yet up to the task of baking a whole cake, mind you.  There is no sensible reason why.  I am just intimidated.  I am working up my nerve.  What better way to do that than to bake cupcakes?  Essentially miniaturized versions of cake. That might not mean that they are less of a challenge but it seems that way.  Besides, this was my third attempt at cupcakes and, since my first two were relatively successful, I figured it can only get better.  I am having fun with the idea of making a really good cupcake because, in all earnestness, they are not my favorite dessert.  Yellow cake and not-so-chocolaty chocolate frosting doesn't light my flambe`.  I would like to recreate this cutie dessert with more interesting flavors and textures.  Maybe it will appeal to a more sophisticated palate than the second grade classroom birthday party.  If cupcakes are mini cakes, why can't they be strawberry shortcake, molten chocolate or even lemon meringue.  Well, this sweet-toothed girl can dream, can't she?

The final result was something I call a Butter Rum Cupcake.  I say final result because the end result strayed from my intended recipe.  The original recipe was from a book on fanciful cupcakes and was called a Tres Leches Cupcake.  It involved preparing a mixture of heavy cream, condensed sweetened milk, evaporated milk and rum, ahead of time with which to soak the cakes when they came out of the oven.  It seems that I had confused evaporated milk with dry milk (no, in fact, they are not the same thing) and the result was not only ineffective in creating a soaking agent but downright distasteful.  The dry milk was a powder and essentially soaked up all the other liquid ingredients and, to make it worse, the whole thing smelled like baby formula.  Ick!  Maybe, I wondered, this time I can skip this step.  Next, I took on an unfortunate and dreaded task that is harder for me to face than all other culinary tasks.  I threw it out and moved on.

Now for the cake, sans leche.  This recipe is a adapted from Cupcakes, by Shelly Kaldunski.  I doubled the recipe for the amount of guests that would be at dinner and replaced half of the vanilla extract with rum since there is no longer a rum soaking liquid.  This cake is very spongy and I would definitely be willing to try soaking it in a rum mixture another time.  Lucky for me, it was flavorful enough with a not too dry texture to hold its own without drowning it in milk and rum. 

Rum Cake Sans Leche  (makes 22 - 24 cupcakes)

2 cups flour
1 1/2 cups sugar
2 teaspoons baking powder
1/2 teaspoon salt
6 eggs 
1 cup milk 
1 teaspoon vanilla extract
1 teaspoon dark rum

Using a bowl and whisk or a kitchen mixer, mix together flour, sugar baking powder, and salt.  Then add eggs, milk, vanilla and rum and mix until all ingredients are blended.

Line your cupcake or muffin pan with paper or foil liners.  Fill them two thirds of the way with batter.  Bake at 350 degrees.  Make sure your rack is positioned in the middle of your oven.

Buttercream is one of those classic icings that if is done well, can be amazing and if it isn't just tastes like sugar.  So buttercream was something I wanted to know how to do from scratch and to do well.  Besides here is where I was really going to get my butter flavor to validate the name Butter Rum for my cupcakes.  The first recipe I tried for buttercream used egg whites.  I am not sure what part of the recipe didn't work honestly.  I combed through it a few times and could not find the step I missed or misinterpreted.   I meticulously whisked the egg whites and sugar in a heat-proof bowl over a low simmering pot.  I transferred that to my mixer and added the butter piece by piece along with the exact amount of rum. Still, it fell flat and began to separate.  Despite the recipe saying to put in under the mixer on high if such occurs, I could not revive it.  I did the unthinkable for the second time that day.  With a heavy heart I threw it out and started again, all the while hearing the chiding voices of my parents reminding me of starving children all over the world.

Trusted Mark Bittman to the rescue again.  His recipe was much easier and got a much better result.  It had that real butter taste that married perfectly with the rum.  I could have kicked myself for not trying it sooner.

It is hard for me to accept I have made a mistake that I can't fix.  My early New Year's resolution is to shrug my shoulders and start from scratch.  Something might just turn out better that way.

Rum Buttercream Frosting  (adapted from Mark Bittman's How to Cook Everything)

8 tablespoons (1 stick) butter
4 cups sugar  (The original recipe calsls for confectioners sugar but I was out.  I probably will try it that way next time to see the difference.)
6 tablespoons milk
2 tablespoons dark rum

Cream the butter and add sugar and milk alternately.  Add more milk if frosting is too thick.  Stir in the rum.

Thursday, December 9, 2010

Stylish Blogger Award: Thank you and I pass this on to...


Thank you, Kitchen Morph.  This is from a fellow food blogger and I am honored it came from such a talented cook.  If you haven't been visit http://kitchen-morph.blogspot.com/.  I mean this sweet and savory lady uses flavors in ways I haven't even thought of.

However, as with any honor, there are responsibilities upon excepting this award and I shall fullfill them.  First responsibility is that I pass on this award to three other bloggers.  Or was it four?  What the heck, let's make it four.  (Kitchen Morph, my dear, I am excluding you only because you have already been honored.  I hope you understand.)  My winner today are:
  1. You Fed a Baby Chili? - http://www.youfedababychili.com/ , where food waxes poetic.
  2. Scarpetta Dolcetto - http://scarpettadolcetto.wordpress.com/, sweet little shoe, you are an Italian cook after my own heart. 
  3. Gourmet Gadget Girl -http://gourmetgadgetgal.blogspot.com/2009/12/as-far-as-gourmet-gadgets-go-i-suppose.html, kitchen experience to relate to and tips for everyday.
  4. Sweet Bitter Tart - http://sweetbittertart.blogspot.com/ - to learn a little history about the foods you love and for the great illustrations.  
The second responsibility is to reveal three things about myself.  (Or was it four? Let's make it three.)
  1. I am truly happy when I am making things.
  2. I am really good at being a beginner and I probably will always consider myself a beginner at the things I love to do.  Instead of a cook, I would say I am a food enthusiast.  Rather than an artist, I call myself a creative person.  It reminds me of how much more room I have to grow.  I am pretty content as a small speck in the universe as long as the universe stays as marvelous as it is.
  3. My favorite color is red.
Thank you again for the award and for bringing my attention to the blogs your reading.  A big thank you to everyone who has read or has been reading my little blog.

Wednesday, December 8, 2010

To Burundi with Love: Cauliflower Mac and Cheese

Mac and cheese is the ultimate comfort food (excluding vegans of course). This is another recipe for my dear friend in Burundi, where it appears cauliflower is also plentiful.  During my own short lived vegetarian life, cheese was an important part of my diet, not just for the protein factor but for the decadence factor.  If you can't have meat what would be your next go to when you want to indulge a little?  So I am feeling some serious empathy pangs for Melissa in a country where only one type of cheese is available.

Still, there is one.  And one that sounds pretty versatile at that.  Melissa mentioned that there is a Congolese cheese that is akin to a mild cheddar.  I usually use three parts of sharp cheddar with one part of a cheese that has a little tang like gruyere or blue.  With a milder cheese, I found that you have more room for a balance of flavors.

Have your cauliflower chopped and cheese shredded before you start.
I always start my mac and cheese with a roux.  Melt 2 tablespoons of butter, then add 2 tablespoons of flour and stir rapidly.  This will only take 30 seconds to cook.  Then add 2 cups of milk.  A dutch oven is perfect for this recipe so you can take it from the stove to the oven.
When your milk is heated, add your shredded cheese a handful at a time.  The amount of cheese you add is to taste.  I just stop adding when I get the thickness I like.  I shred about 6 oz. beforehand.
I added the cayenne pepper (to taste) and a tablespoon of dijon mustard to the cheese sauce to round out the flavor and give it a little kick.  Bread crumbs are going to give a nice texture later on so keep them on hand.

Sautee` your cauliflower in a skillet.  I like to use grapeseed oil for sauteeing this, but if your in Burundi, try to use butter.  If you can't use the corn oil and let me know how it turns out.  Add salt and pepper to taste. You will know it is done when it is tender and the edges turn golden.  For the last step toss your cooked pasta and cauliflower into the cheese sauce and mix well.  Then sprinkle bread crumbs to the top and stick under the broiler until the top sets. 
Mmmmm... What's missing? A beer? 


Monday, November 29, 2010

To Burundi with Love: Pineapple Salsa as a Starter

Cooking is like giving.  It is a way I show affection and involves a careful attention of the needs of others. It requires sharing the flavors that I love with understanding the tastes, needs and sometimes lifestyle choices of the person I am are cooking for.  Writing is like remembering.  It is a way that I hold on to details and savor them.  It is natural for me that these two activities should go together.

This blog post is for Melissa.  Melissa is one of my oldest friends (as in going back the farthest in my memory, not oldest in age).  We met the second year of high school at our after school job in a library.  We may have had everything in common then except our tastes in food.  I have always been adventurous eater, even then.  Melissa grew to be one later but in those days a hamburger with cheese was a little too exotic ( really, no cheese, no bun).  I vaguely remember an issue with spaghetti sauce where Melissa reverted to noodles with ketchup.

Thankfully Melissa made it through that phase and so lessened the strain on our friendship (just kidding, Mel!).  These days both of us have varied our eating habits largely based on our social, political and environmental views as they relate to the food industry.  Melissa, although no longer shy about trying new flavors, is now a vegetarian.  So this noodle-and-ketchup girl did not hesitate to dig in to my fontina polenta topped with sauteed ramps.  Times certainly have changed. 

In addition to vegetarianism being on the list of contributions to a new way of looking at diet, Melissa currently lives  in Bujumbura, Burundi. We said goodbye in May before she moved and the question arose: "what will I eat?"  There was not much way of knowing what to expect in terms of what types of food would be available and in two years she is bound to get homesick for some familiar flavors.  Alas, no beloved broccoli in Burundi.  What does Melissa do without her broccoli?  "As soon as you get the chance send me a list of the foods that are most available and I will come up with recipes for them," I offered.

She has since assured me that she is eating alright although missing the occasional few comfort foods from home.  Recently though, she sent me that list. so I will devote some blog posts to the challenge of cooking in Burundi...from New York.

Cut the top and bottom of pineapple off so that it is easier to cut off the spiny skin.  Then you can take your knife and cut down along the side of the pineapple, removing the skin.

Pineapple Salsa

1 pineapple
2 serrano pepper (can substitute another hot pepper or chili)
2 scallions chopped fine
salt
3/4 cup chopped mint leaves (can substitute cilantro but you should probably use less)

Toss and refrigerate.  This is better when the flavors get a chance to mingle.  I would make this at least 2 hours in advance.  
This is a great pairing with tortilla chips or fried plantains (easily found in Burundi, I believe).


We are the same in our thirties as we were in our teens.


Wednesday, November 10, 2010

Community Table: Biscotti di Pignoli

Pine nut macaroons.  They are the simplest cookie.  My mom made these at Christmas every year.  Like a lot of other moms, she made dozens of cookies at that time of the year.  Pink and green butter cookies that were piped out of pastry bags, cookies with rainbow sprinkles, snickerdoodles,  chocolate peanut butter clusters and, of course, pine nut macaroons.  I always ate too many of the chocolate peanut butter clusters.  They were definitely good but in that I'm-a-kid-and-I-get-to-eat-junk-food-today kind of good. I would always bring the pretty butter cookies to school.  The snickerdoodles were paired with hot chocolate on Christmas Eve so that we could leave a plateful for Santa.  Sadly, I overlooked the pine nut macaroons.

Maybe its that they sounded like cookies for grown-ups.  If you give any child a choice between chocolate and pine nuts, you know what they will choose.  Besides, they have no fancy colors or gooey texture.  They are just good.  Good in the way that something that has only four ingredients can be.  There is nothing fancy for these ingredients to hide behind.  I have seen other recipes that have flour and butter but for me it takes away from the taste of the sweet almond paste.

I like all the cookies my Mom makes but now I reach for the pine nut cookies first.

Biscotti di Pignoli

  • 1 cup sugar
  • 3 egg whites
  • 16 oz. almond paste (if you are from Napoli you would make your own from ground almonds, if you are not you can find it in 8oz cans a the supermarket)
  • 1 cup pine nuts
  • Confectioners sugar for sprinkling (optional) 


The fifth ingredient on the far right, confectioners sugar, is an optional garnish.  Actually, this time we left it off.  Papa` was already brewing coffee before they came out of the oven so no time to make them pretty.
The cookie sheets are lined with parchment paper.  This is my Mom and her baking is very organized.  Ingredients and bakeware are lined up and promptly put away in the order she is done with them.
After you separate out the egg whites, beat them with a fork until you get a little foam on top.

Mix sugar and almond paste first.  While the mixer is on low add your egg whites.
A taste, anyone?
Dad drops in to taste the batter.
Spoon out batter with about an inch and a half between each cookie.  Sprinkle pine nuts on the top.
Bake for 20 to 25 minutes at 300 degrees.
Serve with a good espresso!


Wednesday, November 3, 2010

Community Table: El Salvadorian Pupusas!


I have been meaning to do more posts under the title Community Table.   I am a pretty good cook but only because I am so inspired by other great cooks I come in contact with.

This past weekend I had the honor of bringing the most delicious home-made pupusas to a party.  Some guests  already had heard of or tried them before but most had not.  Either way, once I uncovered them they barely made it to the table.  I thought I would cut them up and serve them as appetizers.  They were snatched up too fast.  One by one guests were first biting into these warm, stuffed, tortilla-like patties then asking "Wow, what is this?" (instead of the other way around).

I must admit, if you hand me anything stuffed with melted cheese I am yours.  My husband could have proposed on the second date with a jalapeno popper.  I like to tell people I fell in love with Rome because of the grand history of architecture that make up the city but it may very well have been the suppli`.  I might even swoon over a really good grilled cheese sandwich.  Let's add pupusas to this list.  Although melted cheese is not their only charm.  The typical pupusa you will find in this country is usually filled with queso, frijoles and chicharon or in other words cheese, beans and pork. But as Maria told me in El Salvador you may find more of a variety of fillings such as shrimp, small fish or zucchini.

Maria is the lovely lady in the picture above who showed me how she makes her pupusas.  She has been generous enough to show me how these wonderful snacks are made.

The dough of the pupusa is made with corn masa, which is like a cornmeal.  It is mixed with water to make a dough-like consistency.  The cup is filled with corn oil that you will add on the surface of the pupusa just before it goes on the griddle. 
Maria shows me how to pat the dough, turning it in a circle so the form is even on all sides.  We dip our hands in a bowl of water to keep the dough from sticking to our fingers.
We are filling the pupusas with cheese first. Maria uses a shredded mozzarella but I think most mild cheeses that melt well will work.  Then there are black beans that have been pureed to a paste.  The third mixture is pork.  The ground pork is cooked first and then pureed with raw onions, bell peppers and tomatoes. These three ingredients will melt together perfectly on the griddle.
Then Maria showed me how to carefully close the masa dough around the filling and then use the same circular patting motion to reshape it into a disc.  Maria does this expertly but to be honest I need a little practice.  The masa is very soft and it takes a skilled and gentle hand.
These are cooked on a cast iron griddle that goes right over the stovetop.  You don't want to forget to smear a little bit of corn oil on the surface of the papusa before you put it on the grill.  It isn't too different than cooking pancakes.  It takes a couple of minutes for each side to set and get some good toasty color.
There are two condiments that go with papusas and, please, do not forego them.  It is a mistake.  They are simple but they add a subtle complexity to the dish.  On the left is like a slaw that is made with cabbage that has been steamed in boiling water, then tossed with carrots, onions and a dash of white vinegar and oregano. On the right is a simple, salted tomato puree.

So if you are in Brooklyn, think about bringing some papusas to your next party!


Friday, October 29, 2010

Conscientious Choices: Our Last CSA Day

My newfound interest in baking is getting me in trouble.  I mean, what was I supposed to do with all those apples anyway.  Sure, I ate them raw, admittedly, two or three a day.  But then there was the apple pie.  Let's not even discuss the two batches of apple cheddar scones.  (All you other bloggers aren't helping, you know!)  The word gluttony never came to mind while I was slathering butter on my second, dare I say third warm scone.  Yes, I have been over-indulging and I certainly feel it.  If this keeps up pretty soon I will be able to see it.  It isn't even Thanksgiving and there are still more flour-based, butter laden, possibly even meat or cheese filled adventures to be had. Somewhere in my days I need to exercise some constraint.  Or just exercise.

I will never count calories.  It just isn't who I am.  I will never use measuring cups and scales to control the portions of my food.  I have a few simple and pleasant dieting rules: 1) No skipping meals.  If I ate a little too much the night before, of course, I am not going to be hungry the next morning.  Skipping meals always makes things worse and I am always inclined to do it.  2)  Avoid seconds and know when I am full.  This is hard.  3)  Less meat and dairy and more vegetables.  That's easy.  I love vegetables.  4) Lay off the refined white sugar and flour.  Alas, my downfall these last couple of weeks.

So essentially, I am just eating different things.  Swapping out ingredients.  I like that much better than "dieting."  I can't think of an uglier word.  Lucky for me I don't have any food hang ups.  Scratch that.  I have a few but namely in the form of processed or bad quality foods.  I am not a fan of most packaged foods and the smell of old frying oil used in a fast food chain is vile.  Any well prepared ingredient, however, I will eat.  Alligator meat?  Shark cartilage?  Malaysian pig intestines? Why not?  So needless to say, I can shift ingredients for a while. (At least until the next blog post!)  As much as I love my more decadent dishes, I also like the culinary creativity this offers me.  It forces me to try new whole grains and combine flavors in new ways.
Our Last CSA Share of the Season

Wheatberry Salad with Roasted Beets, Turnips and Pomegranate Seeds Served in a Roasted Acorn Squash
  • 1 1/2 cups wheatberries
  • 3 beets 
  • 1 red onion
  • 1 bunch of turnip heads
  • Half a pomegranate seeded
  • Sweet Balsamic Vinegar
  • Olive oil
  • Salt 
  • lemon

For a salad like this I boil the wheatberries like I would pasta.  Be aware that it takes a long time to cook.    Maybe 45 minutes to an hour.  I get these going first and then work on the other ingredients.
Toss the beets, turnips and onion with a little salt and olive oil.  Then bake them in the oven at 400 degrees until tender.
The coconut oil is the consistency of soft butter.  You can just spread it on the halved squash. They will roast in the oven with your beets and turnips at 400 degrees.
Here are the vegetables right out of the oven!

Don't forget to add these in when you toss your beets with the wheatberries.


Apple Salad with Turnip Greens

  • sliced apples
  • turnip greens
  • lemon
  • olive oil 
  • salt
I made a quick salad to accompny the main with apples tossed with fresh lemon juice, olive oil and salt.  It always amazes me how the simplest fresh ingredients can be so good.  I used the greens from the Japanese turnips in the wheatberry salad.  They have a taste like mustard greens that is a nice compliment to the sweetness of the apples.  Besides, I don't like waste.

I promise for this one night you will not miss your dairy, meat, sugar or white flour!  Besides you can have them tomorrow!