Friday, December 30, 2011

A Salt's Worth

Boy, did I get some good Christmas presents! Yes, my loved ones know this foodie well.   I won't bore you with the list but let me show you these salts I got.


I know good salt when I taste it,  like that crunchy, flaky, sea salt or specialty salts with hints of truffle or garlic.  The smoked salt in this picture smells like the inside a barbecue pit.  Last night we tried a little of the Hawaiian red salt in a tossed broccoli and chickpea salad.  It was great, but here is where the subtleties of salt get daunting.  I mean when you enter the zone of red, pink, gray and black salts it is hard to know when to use which salt.  It's a place where all white sea salts are not the same.  All of a sudden my culinary universe has grown.   Do I start with a row of tiny bowls and a caviar spoon?  How do I know which salt is best for which dish?


As you can see I am still very new to the wide world of salt but here is what I have learned so far.
  • Hawaiian Red Alaea Salt gets its name and color from Alaea volcanic clay.  It is used in Hawaii to preserve meat, flavor pork at a luau and in a raw fish appetizer called poke.
  • Sea salt does not actually have less sodium than table salt but because of its size and flavor, one tends to use less.  See here and also here.
  • Black and pink salts tend to have a more mineral or sulfurous taste.  
  • Fleur de sel  is sea salt harvested on the western central coast of France. 
  • Whole foods has a good beginners salt guide.  Click here.
And here is what I recommend:
  • If you live in NY go to Oil, Vinegar and Salt in Chelsea Market for and amazing selection of salts (as seen in pictures above and below. 
  • Try smoked salt on Spanish mackerel because it is awesome!


Tell me more about salt.  I would love to here what you know.

Monday, December 19, 2011

Thinking of Giving Fruitcake Another Try?


What happened to fruitcake?  Once upon a time it was a staple of the holiday season.  You gave one and someone gave you one back.  Then it made a home on your counter until after New Year's, staring at you with beady little red and green maraschino eyes.  At our house it eventually became a bad joke.  Oh no, not another fruitcake.  You may as well have said "head cheese."  They have the same visual appeal but the fruitcake weighed about five pounds more.  These were our fruitcake jokes.  Not to mention that, despite its name, it was reminiscent of neither fruit nor cake.  Until one day everyone caught on to the jokes and, at least in my memory, people stopped giving fruitcakes.  And we didn't miss them.  At least some of us didn't.

Recently the word "fruitcake" was brought back into my vernacular.  When fretting over my lengthy Christmas gift list, I called my mother-in-law, Andrea, to brainstorm gift ideas.  "You could get Grandpa Andy a fruitcake.  He actually likes it."  I replied with an eager "Great!" having heard the word bake before the word fruitcake.  Truth is, I really didn't know what went in a fruitcake.

Actually, this little cake as a very interesting history.  It dates back to Roman times when it's ingredients were primarily pomegranate seeds, pine nuts and mashed up barley. Throughout its long history the recipe has changed.  The crusaders added preserved fruit, spices and honey in the Middle Ages.  In the 16th century sugar was added.  In the Victorian Era, they added alcohol which I am sure helps its long shelf life. It may have also helped it being outlawed in eighteenth century England for being "sinfully rich."  Most interesting to me is that throughout its history this cake has been gifted to soldiers.  The Romans took it with them as sustenance during battles and it has been known to be given to soldiers in decades as recent as the 1960s.  If you are interested, you should read more about here and also here. 

So as you can see I did a little fruitcake research.  I found a great recipe on Chow by Aida MollenKamp called White "Groom's" Fruitcake.  I loved the choice of dried fruit (pineapple and cherries) and the use of Cointreau as the liquor ingredient. It feels special and festive without having to be neon colored.  If you ever happen to read this, Aida, thank you, you will make Grandpa Andy happy this Christmas.  I would also love to know where this recipe got its name. 


White "Groom's" Fruitcake
adapted from Aida Mollenkamp

Makes 1 loaf

Fruit:
1 cup pecans
1/2 cup walnuts
3/4 cup dried tart cherries (left whole
3/4 cup raisins
3/4 cup dried pineapple rings coarsely chopped
1/2 cup of Cointreau

Cake:
1 1/2 cups all purpose flour
1/2 tablespoon of baking soda
1 teaspoon kosher salt
1/2 a teaspoon cinnamon
1/2 a teaspoon ginger
2 sticks of butter
3/4 cup sugar
3 eggs
Bourbon for aging

For the fruit:

Combine all ingredients in a bowl and toss.  Cover tightly and let sit at room temperature for 24 hours.

For the Cake:

Preheat oven to 300 degrees and make sure your rack is in the center of your oven.  Grease a 9 X 12 loaf pan with butter, set aside.  Whisk together flour, baking soda, salt, cinnamon and ginger in a large bowl and set aside.  Using an electric stand mixer beat butteron medium highabout 3 minutes.  Add sugar and beat another 3 minutes.  Add eggs one at a time.  make sure each egg is thoroughly mixed in before you add the next.  Scrape down the sides of the bowl when necessary.  Transfer the batter to a large mixing bowla dn add the bowl of dry ingredients you set aside.  Mix in fruit that has been macerating little by little until it is fully incorperated.  Pour into your greeased loaf pan.  Bake for about 1 hour until golden.  When you stick a in a toothick it should come out clean.  Let cool for 30 minutes.  Brush with bourbon every 10 days for up to 3 months.

Tuesday, December 13, 2011

Printable Holiday Menu Planner Giveaway!


So here is how you can print your holiday meal planner below:
  1. Double click on the image below.
  2. Then right click and you should see a window of choices.
  3. Select print.
or
  1. Double click on the image below.
  2. Click on File tab
  3. Select print.

Sunday, December 11, 2011

What do you do with your Leftovers?


Saturday night's polenta made a great Sunday morning brunch.  Something I learned from the culinary talents of my aunts and cousins is that if you made a great pasta or rice dish the night before, chances are it will make a great torta then next day.  It is amazing what adding a egg or two will do.  If you have cheese (parmesan, fontina or mozzarella) even better.  Our Saturday dinner was a simple polenta with mushroom and tomato sauce.  The next day we mixed it together with 2 beaten eggs and added it to a hot skillet.  Once the bottom set it went in the oven at 350 degrees until it was done all the way through.  Then we topped it with poached eggs because, let's face it, everything is better with a poached egg on top.

What do you do with your leftovers?  

Wednesday, December 7, 2011

Manila Clams over Leek and Flounder Risotto

I made this on a Monday night.  A Monday night in December when I had gifts to make and buy and wrap, designs to complete, work lunches to pack and a floor to clean.  I haven't even touched the subject of cookies yet.  If you think that is bad, on Friday I made a chicken pot pie.  It all started with a casual glance toward my cookbook shelves.  One of those large, glossy pictured, hard covered beauties were calling me.  Sit down, it said, take a load of for twenty minutes or so and read about something rich and delicious.  The cookbook that was calling to me was a collaborative one by Julia Child and Jacques Pepin.  I should mention that I just finished reading Julia Child's "My Live in France."  Now I am craving butter.  No, I won't reduce my cravings to just butter.  I mean really, when do I not crave butter.  It's that I was transported to a kitchen where food preparation can be poetry.  Don't just throw your aromatics in a stock pot, stud your onions with whole cloves first, bundle your herbs into a bouquet.  You think it shouldn't make a difference but when you smell the fragrant steam of your gently bubbling stock you know it does.  Just as when you you slow down and prepare anything with love and attention it always shows. 

I know this isn't a slowing down time.  Maybe that's why I always feel a little grouchy or blue at the close of the year.  Because I know in a blink it will be gone.  Sometimes there is so little time for savoring the present before we have to start all over again. 

I promise, next time I'll get to the cookies. 


Fish Stock

  • Half of a medium-sized (or a quarter of an extra large) onion 
  • 2 small carrots chopped
  • 2 celery stalks, chopped
  • 3 to 4 sprigs of parsley
  • 3 to 4 sprigs of thyme
  • 1 leek leaf
  • 4 whole cloves
  • 1 bay leaf
  • 1/2 a teaspoon kosher salt
  • fish bones, head and tail
  • 8 cups of water
Stud the onion with the whole cloves.  Using kitchen twine, tie together your herbs and leak leaf.  Now add all of your ingredients to your stock pot and bring to a boil.  Lower your heat and keep at a gentle boil until the stock is reduced by 1/4 of the liquid.  Pour your liquid through a strainer and into a bowl.
    Broiled Flounder
    • one skinless, boneless fillet of flounder
    • 3 to 4 sprigs of thyme
    • 3 to 4 sprigs of parsley
    • sea salt for sprinkling
    • black pepper
    • olive oil for drizzling
    • 1 sheet of parchment paper
    Preheat the oven to 400 degrees.  Lay thyme and parsley on parchment paper.  Then lay the fish fillet on top of the herbs.  Sprinkle with salt, freshly ground black pepper, and a drizzle of olive oil.  Fold paper around the fish.  Broil in the oven for 5 minutes.

    Risotto

    • one leek cut in half and diced
    • half a medium onion, diced
    • 3 tablespoons olive oil
    • pinch of crushed red pepper
    • approx. 4 cups of above fish stock
    • 4 to 5 saffron threads
    • White pepper
    • sea salt for sprinkling
    • half a lemon
    • 1 and 1/4 cup arborio rice
    • 1 broiled fillet of flounder (above)
    Heat your olive oil in a dutch oven. Add onion, leek and crushed red pepper.  Sautee` until soft and onion is translucent.  Add your rice and toss so that it is evenly coated.  Just as it is starting to feel dry add a ladle full of fish stock.  Stir and let the rice absorb the stock completely.  Stirring is very important to risotto.  It releases the starches and makes it creamy.  The more you stir the better.  Add another ladleful of stock and repeat. On third ladle, add your saffron threads.  Continue slowly adding stock until your rice is creamy and tender.  Add salt, white pepper and squeeze in some lemon juice to taste.  Crumble the flounder and toss in the risotto.
    Steamed Manila Clams

    • one carrot diced
    • one stalk of celery diced
    • half an onion diced
    • 2 tablespoons of butter
    • 1 dozen manila clams
    • 1 large handful of chopped parsley
    Wash clams by putting them in a bowl of cold water with a inch of cornmeal.  Let sit for 5 to 10 minutes. Heat your butter in a medium saucepan.  Add your celery, carrots and onion when the butter is melted but not brown.   Sautee` until the onions are translucent.  Add your clams and cover.

    Monday, November 28, 2011

    Dinner on the Fly: Spaghetti and Meatballs

    Spaghetti and meatballs.  Do I even need to write anything else?  It is sinful and comforting, ethnic and universal.  Some version of this classic dish has been a part of almost all of our kitchens growing up.  My favorite version of it is the simplest one.  What is your recipe?  Do you make it spicy or give it a twist?

    Meatballs
    • 1/2 lb ground beef, pork or veal (or a combination)
    • 1 clove of garlic, chopped
    • 1/2 an onion, chopped
    • 1 egg
    • 1/2 teaspoon oregano
    • 1/4 cup bread crumbs
    • 1/4 cup Parmesan cheese
    Preheat your oven to 400 degrees.  Line a sheet pan with  parchment paper.  Put all the ingredients a food processor and pulse until blended.  Careful not to pulse too much or you will get a puree.  take about 1/2 a cup of your mixture (small snowball size ) and roll into a ball.  Place each one on the parchment paper lined pan about 2 inches apart.  Keep a bowl of water nearby to dip your hands in so that the meat doesn't stick when you are rolling it. Bake for 25 minutes. then add to your tomato sauce.

    Tomato Sauce
    • one can of crushed tomatoes
    • 2 to 3 tablespoons of olive oil
    • 2 cloves of garlic, smashed and peeled
    • sea salt
    • black pepper 
    • chopped fresh parsley
    • Parmesan cheese
    Heat olive oil in a saucepan on medium low heat.  Add garlic (with cloves intact or chopped if you like your sauce a little more garlicky).  Sautee` until fragrant but be careful not to burn.  When fragrant add your tomatoes and stir.  Keep at a simmer for about an hour.  Add meatballs when done (about 25 minutes into your simmer). Add salt, pepper and parsley before serving.  Top with Parmesan cheese after tossing with your cooked pasta.

      Monday, November 21, 2011

      Dinner on the Fly: Chinese Hot Pot in an American's Kitchen

      Something about this dish will be lost in translation.  My first experience with food and culture in China and Hong Kong has brought me a deeper understanding of both, if not a full one.  I must have tried forty  dishes during my stay and each one was completely different from the last.  Still, I haven't made more than a small dent in understanding the vastness and complexity of Chinese cuisine. There are flavors that I will always remember and look forward to, should I return, not just for the their flavors but for their unique and artful presentation.  Should I return to Hangzhou, I will want to unwrap the lotus leaf that a whole spring chicken has been cooked in to release the fragrant steam and make sure the head is still intact.  I'll ask for the pot of shrimp brought live to the table, then drowned in rice wine so that their fresh water taste mingles with the sweet acidity.  I would like at least two different green vegetables, cooked to a just wilted bright green, pleasantly salting and tinged with garlic.  Let me not forget to accompany it with a cup of Dragon Well green tea, where the leaves float like plants behind an aquarium's glass and it tastes the way grass smells in Spring.

      Is that what comes to mind when you think of Chinese food? If it is than you win the cigar for for being far more worldly in t the realm of Asian culture than I.

      Traveling to a new place and breaking bread with locals was like a reboot to the way I think about food. Hot pot was one of my favorite dishes in China and Hong Kong.  It epitomized the family style way of dining where a dish is always shared and brought to the table when ready, without our western concept of a sequence of courses.  Hot pot was also one of the simplest dishes in concept.  Perfect for the non-Asian-savvy to recreate at home.  It isn't only an ease of preparation and flavors from my trip that I am bringing to my table with this dish, but the intimate circle it creates as we all share in the cooking and tasting of our meal.

      Not to mention it reminds me of a fondue party, which I love.


      This is a hot chili oil I made by heating peanut oil with garlic cloves and lots of tian jin red chilis. 


      Hot Pot (With a Little of Everything Thrown In)

      For the broth: 
      • 1 lb pork bones
      • 10 garlic cloves, peeled and mashed with the flat side of a knife
      • 1 small yellow onion, chopped
      • three carrots cut in rounds
      • 1 small knob of ginger, chopped to equal about 2 tablespoons
      • 5 small potatoes, diced (preferably yellow flesh)
      • 4 diced scallions
      • 2 tablespoons soy sauce
      • 2 tablespoons fish sauce
      At the table:
      • very fresh, thinly sliced raw top round beef (or substitue and appropriate cut of pork or lamb)
      • very fresh, filet of flounder cut into small bite sized pieces (or substitute another white fish)
      • very fresh, sliced scallops (or shelled and cleaned shrimp)
      • chopped shitake mushrooms
      • snow peas (or bok choy)
      Dipping sauce:
      *simple soy sauce is fine here.  I went to one restauraunt and there was a make your own dipping sauce bar so I tried to recreate what I did which was delicious.  I did not measure I just added buy taste
      • soy sauce
      • peanut butter
      • fish sauce
      • minced garlic
      • minced scallion (green parts only)
      • 1 minced dried red tian jin chili

        In a large stock pot, add pork bones, chopped onion, garlic, carrots, ginger and potatoes.  Bring to a boil.  Keep at a gentle boil uncovered for 1 1/2 to 2 hours.  You want about a fourth of the liquid to reduce.  While still boiling add your soy sauce, fish sauce and scallions.  You want to keep this soup as close to boiling heat as you can because you are cooking ingredients in it at the table.

        The rest of this recipe happens at the table.  It is in the layout.  I used fondue pots to keep the soup at a temperature that cooks your ingredients.  Then I ladled soup into individual small bowls for sampling.  Dipping sauce was in everyone's reach. I made sure my meat and fish were cut small so that it cooked at the end of our chopsticks.  Vegetables were added by the handful, pulled out and served when bright and tender.  It was awkward at first but we got the hang of how and when to reach over one another, whether we dipped our fish, meat or vegetable into the sauce or added the dipping sauce into the bowl and how long to hold our raw ingredients in the hot broth.  Like any firsts, we got the hang of it.

      Friday, November 11, 2011

      Fundraiser Brunch: Recipes and Thanks

      I have been thinking a lot about what it means to make positive contributions to the world we live in.  That being said I have been wondering in what way I can use my own skills to do that.  What does it mean to live a life that is conscientious in addition to one that balances our joys and our survival?

      So my dear friend, Janice and I made a recent call out to the internet universe (and a few neighborhood establishments) that we were holding a fundraiser brunch to raise money for the Food Bank of NYC.  Food for food, so to speak.  As promised in our menu, below are the recipes of the food we served as well as some photos of the event.  Hope it inspires, both cooking and kindness.

      I want to thank all of you who came out to donate to the cause and show your support for Food Bank of NYC (and for Janice and I).  Thanks also to Veronica People's Club that allowed us to use their space.


      Clementine Blackberry Compote
      • 10  peeled and sectioned clementines
      • 1 quart blackberries
      • simple syrup (1/2 cup sugar, 1/4 cup water
      • orange juice (1/2 cup orange juice)
      This is a simple fruit salad with and orange dressing.  Simple syrup is 2 parts sugar to 1 part water.  Bring your water to a boil.  Once boiling add your sugar stirring constantly until dissolved. Remove from heat and add orange juice.  Allow to cool before adding to your fruit for a lighter fresher fruit salad.  Or add your fruit to the dressing and cook until their juices are released and serve warm.  Great over yogurt.


      White Bean Chowder
      • slab bacon
      • 1 large onion
      • 2 teaspoons dry or 1 sprig fresh rosemary
      • 16 ounces dry white beans, soaked and cooked until soft
      • diced white or yukon gold potatoes
      • salt
      • pepper
      • 2 tablespoons olive oil 
      • 5 inckh square of cheese cloth
      • 1 quart chicken broth
      In a large soup pot or dutch oven, sautee bacon in olive oil until crispy. Add onions and cook on medium in rendered bacon fat until transluscent. Put your rosemary in a the center of cheese clothe square and tie securely.  Add your broth, cooked white beans, potatoes and rosemary pouch.  Add water to adjust the thickness of your soup.  Cook until the potatoes are tender.

      Salad with Red Grapes and Walnuts

      • 1 head of red or green leaf lettuce (or a mixture of both)
      • 3/4 cup red seedless grapes halved
      • 1/4 cup chopped walnuts
      • olive oil
      • white wine vinegar
      • salt pepper
      Wash and dry lettuce completely.  Cut along the vein of the lettuce so that you have two halves.  Then cut in horizontal bite-sized peices.  Toss with grapes and walnuts. Dress lightly with oil, vinegar, salt and pepper.

      Fritatta with Goat Cheese and Dill 
      or

      Parsley, Sundried Tomato and Salami 
      • 6 eggs beaten
      • chopped parsley or dill
      • 2 small potatoes sliced on the thinnest setting of a mandolin
      • minced sundried tomato, crumbled goat cheese or genoa salami sliced in small strips
      • salt
      • pepper
      Preheat your oven to 375 degrees.  Heat your oil in a 9 inch cast iron skillet.  Once your olive oil is hot but not smoking layer your potato slices in the hot oil, salting lightly in between the layers.  Cover and cook on medium low heat until the potatoes are tender. Add your eggs.  Once they have set on the bottom, scatter your herbs, cheese, tomato or salami (essentially whatever you are using to flavor your fritatta)  across the top. Add salt and pepper to taste.  Cook a little longer until the sides of your fritatta begin to set.  Then transfer into the oven.  Bake until the center sets.


      Baked Pecan French Toast with Honeyed Yogurt


      We used a recipe from Ezra Poundcake.  If you haven't been to this blog yet you should definitely check it out!

      Chocolate Mousse


      This is strictly a Mark Bittman's recipe.   


      Monday, November 7, 2011

      Printable Weekly Menu Planner Giveaway!


      Happy Fall!

      So here is how you can print your weekly meal planner below:
      1. Double click on the image below.
      2. Then right click and you should see a window of choices.
      3. Select print.
      or
      1. Double click on the image below.
      2. Click on File tab
      3. Select print.

      Monday, October 17, 2011

      Harvest Fundraiser

        My dear friend, Janice and I will be cooking a fundraising luncheon to help raise money for the Food Bank of NY.  Come eat some good food and help someone else eat at the same time.  If you read this blog and you a local, or visiting we hope you join us!

      Thursday, October 13, 2011

      Wrappings and Fillings - The Origami of a Potsticker

      Gone are the days of traveling with a passport, a paper map and a change of underwear.  In packing for my two week trip, destination Hong Kong and China mainland. I have triple checked that I have my laptop, camera, chargers, magic jack, Tylenol PM, and an unheard of four pears of shoes.  Clearly traveling light means something different to me now then it did a carefree decade ago.

      Despite having to pack and prepare for this journey, I was inspired by Heidi Swansons's post "Golden Pot stickers"  on her blog 101 Cookbooks.  Maybe it because of the Asian influence or maybe it was because she also was preparing for a flight that I was moved to making pot stickers before this trip  (Once again I leave my kitchen a mess at a very inopportune time.)  In this post I will recommend that you try Heidi's recipe that looks practiced, well-tested and tantalizing.  Mine was, in fact, a disaster.  Let me apologize if you came to this site in search of a recipe and instead found me droning in about the current up sweep of my life and how it connects with the joy I find in the craft of making food.  In my defense I tried to write a fabulous recipe for you, one indicative of this new culture that I am traveling to.....a culture that I know little to nothing about.  That was the problem.

      I made the filling for these pot stickers the way I would have made a ravioli, a vegetable, tofu ravioli.  I was drawing on my own knowledge about cooking and cuisine and this time I fell short.  The effect was bland and mushy with the faintest hint of what I assumed to be Asian flavors:  ginger, scallions, soy sauce, shitake mushrooms  Like an ethnic stereotype, it was an incomplete, inaccurate representation of what a real Asian food experience could be.  Food without that deeper complexity is just filling your stomach.

      Not everything I make is a success, design, food, or writing, but what I have come to know is that the process is what keeps me going just as much as the desired result.  There was a calm that cam over me in folding these wrappers into neat little four-cornered envelopes, trying to get each one more perfect than the last.  A talented artist friend of mine, Jaclyn, told me that when she feels anxious about something she folds origami paper cranes.  There are beautiful bowls full on of them on display in her home.  (Was I anxious?  Could have been the 14 our flight ahead of me.)

      Anyway, I will probably be too busy to see many of the tourist sites on this trip but I do hope I come away with a more authentic idea of Chinese cuisine than what comes in the little white cardboard boxes in New York.    Maybe then you will get your recipe.


      Monday, October 10, 2011

      Accompaniments: Pickled Serrano Chili Peppers


      Usually, when I am making a dish that requires a hot pepper I only need one or two at a time.  But then there I am at the supermarket and all I see are packages of hot peppers.  There just isn't a way that I will use up 20 serrano peppers this week.  But I can pickle them to use later!  I always have a jar of pickled hot peppers in my fridge and I use them in place of the fresh ones in any recipe that calls for one.  They tend to be less hot but still very flavorful. 


      Pickled Serrano Peppers

      • 1 lime cut in eighths
      • 1 clove of garlic sliced or quartered
      • as many chili peppers as you can fit in a jar
      • 1 teaspoon cumin
      • 1 teaspoon coriander seed
      • 3 tablspoons salt
      • white vinegar
      Add lime, peppers, garlic, spices adn salt to a 16oz sterilized mason jar.  (To sterilize a jar and lid, place them in a pot of boiing water for 10 minutes.  Add vinegar until it rises above one fourth of the jar.  Fill the rest of the jar up to the lip with water so no air gets in.  They are ready to go after about 2 days.


      Thursday, October 6, 2011

      Sunday Dinner at Home: Roasted Acorn Squash Ravioli


      Let me start by saying that I do not have a pasta machine.  I have never had one and I am pretty sure my grandmother didn't either.  Saying that doesn't mean that I am opposed to one.  I didn't mean that in the belligerent I-will-never-have-one-and-you-shouldn't-either kind of way.  Quite the contrary, we would probably have fresh pasta more often if I did have a pasta machine.  But you can make fresh pasta without one and it isn't as hard as you think.

      Do you remember what it was like to want to get your hands dirty?  Or to be a kid and need the satisfaction of a tactile experience?  I could not pass a pile of leaves my father had just raked without jumping in it.  How about running your fingers through warm sand and digging down to the cool, damp sand underneath?  When I was an art teacher my students would ask "When do we get to use clay?" starting on the first week of school and every week that followed until we actually did use clay.  They would cheer on painting day from kindergarten to high school.

      That is the joy of making something from scratch.  It literally feels good.  Like cold water and wet clay on a potter's wheel...someone stop me because I will go on forever.  Pasta making is like that too except afterwards you get to eat it!  If you are really nice you might even share it with others.  So what if it took me all day and my kitchen was a mess?  Maybe my furniture, counters, hair and eyebrows are covered in flour, but I had fun.  Delicious fun.


      Roasted Acorn Squash Ravioli with Fried Sage Leaves 
      For the pasta:
      • 3 eggs
      • approx. 3 cups of flour
      For the filling:
      • 1 acorn squash
      • 1/4 cup diced pancetta
      • 1 tablespoon butter
      • 1 small or half of one large onion diced
      • 2/3 cup Parmesan cheese
      • 5 sage leaves chopped
      • salt
      • pepper
      For the garnish:
      • 3 tablespoons of butter
      • remaining bundle of sage leaves

      Preheat your oven to 400 degrees.  Wrap your acorn squash in aluminum foil and pop it in.  This will roast for about an hour and a half.

      On a clean dry surface, scoop out your flour and make it into a pile (like a mountain, as my aunt would say).  With your fingers, make a hole in the center (like a valley, if you will).  You want to make sure this hole goes down to the surface and that the "walls" are pretty high.  Crack one of the eggs into the center of your flour. Gently scramble the egg with a fork.  it will begin to absorb the flour.  When it becomes more of a cough you can begin to knead it with your fingers.  Form the dough into a disc and repeat with the following two eggs.

      On a floured surface, roll out your dough from the center out.  The flour is what makes the dough expand so if the dough is too sticky or not spreading, add more four to the surface.  Roll out the dough as thin as you can get it without breaking.

      In the meantime, you might want to get started on the filling.  Add your butter, pancetta and onion to a hot skillet.  Turn down the heat to medium and sautee` your ingredients until your pancetta is well cooked and your onion is translucent.  Salt and pepper to taste

      When your acorn squash is done, take it out, unwrap it, cut it in half and let it cool.  When it is cool  enough to handle, scoop out the seeds and throw them away.  Then scoop out the flesh with a spoon. Add the squash, pancetta and onion mixture, chopped sage and Parmesan cheese to a food processor and pulse until smooth.  (Or mash it together with a fork if you prefer.)

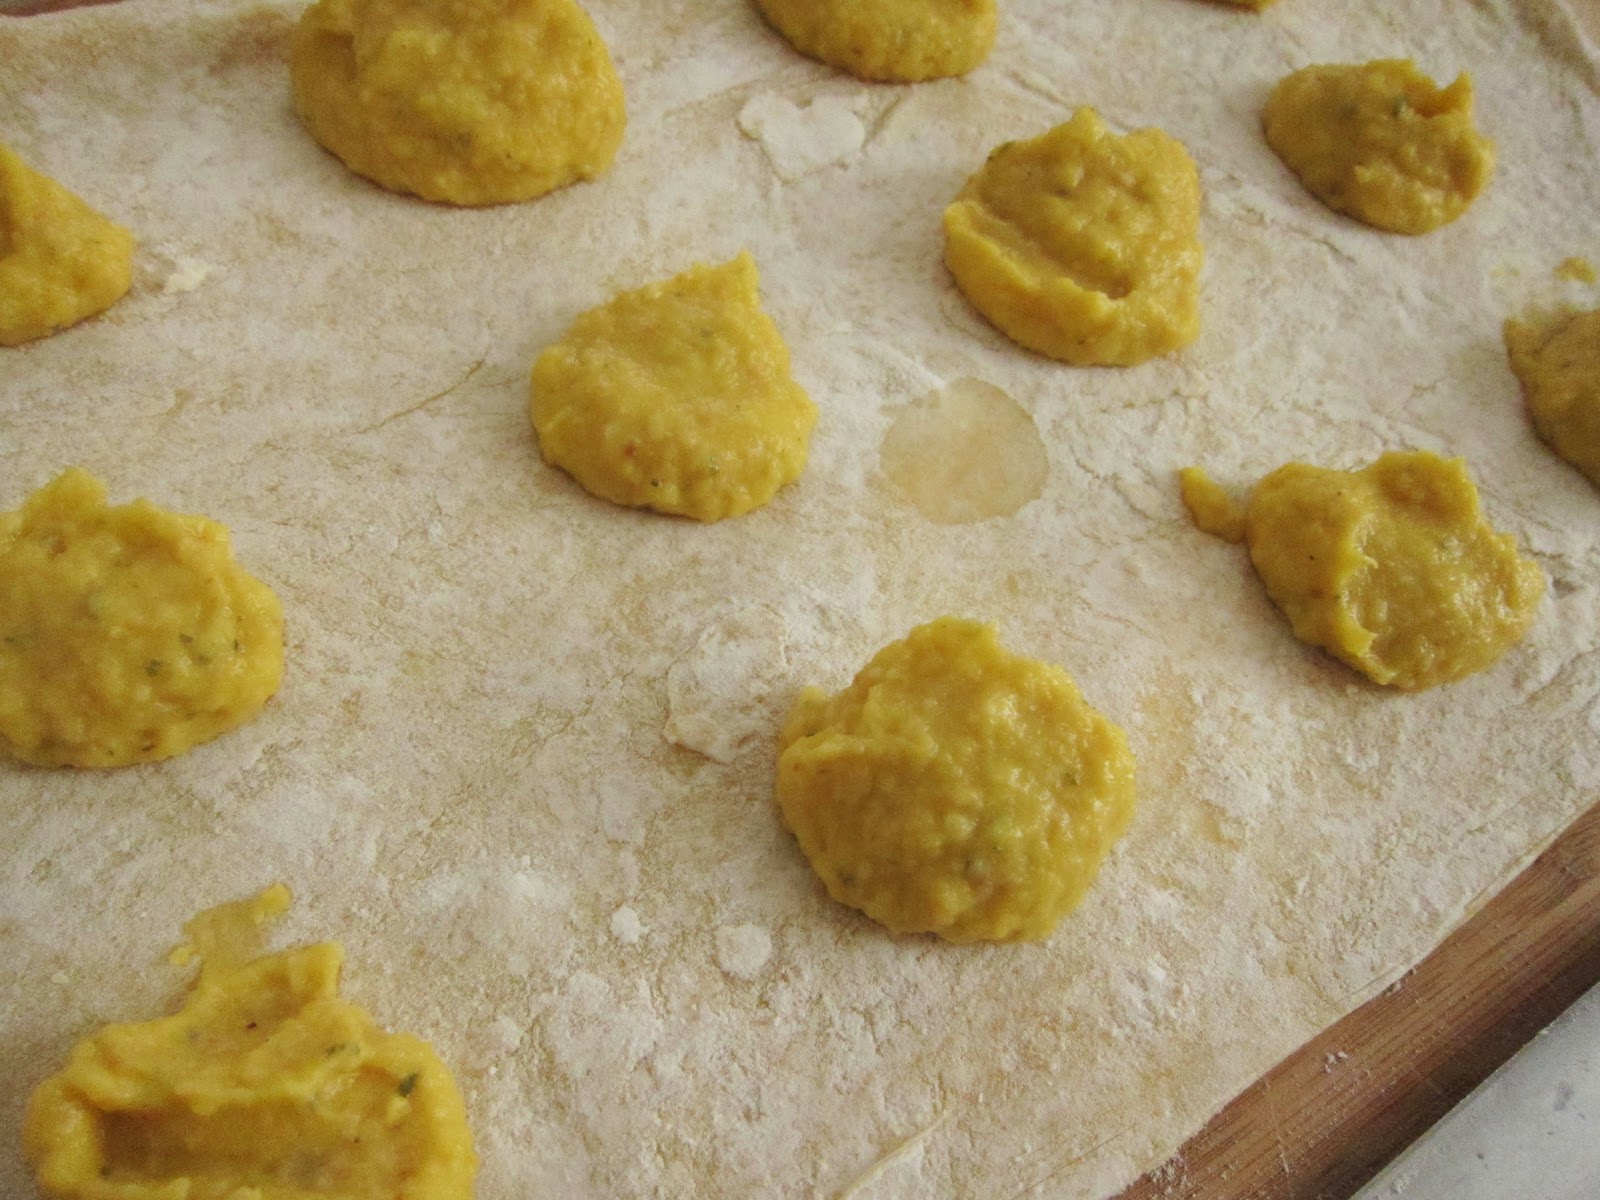
      Lay out one sheet of the pasta and add a spoonfuls of your squash mixture, each about 2 inches apart. Brush a little water on the dough in between.  Lay another sheet of pasta on top and press around each lump of filling with your fingers so that the dough sticks together. Cut your ravioli apart with a knife or pizza cutter.  You want to lay the ravioli out on a tray with some space between them to keep them from sticking together before you cook them.  Boil about three or four at a time, until they float to the top and pucker slightly.

      In a frying pan or hot skillet, melt about 3 tablespoons of butter.  When the butter is hot and melted but not yet brown, add the sage leaves with a generous sprinkling of salt.  Let them fry until they darken and curl.  Drizzle over the ravioli.